Tag Archives: cleaning

Steven Sklare, Food Safety Academy
Retail Food Safety Forum

Ring, Ring, Ring: COVID-19? Beware Your Filthy Cell Phone

By Steven Sklare
2 Comments
Steven Sklare, Food Safety Academy

During the COVID-19 pandemic, the rest of the world has embraced one of the well-known mantras of the food safety profession: Wash your hands, wash your hands, wash your hands. It is equally urgent that we expand that call to arms (or hands) a bit to include: Sanitize your cell phone, sanitize your cell phone, sanitize your cell phone.

A typical cell phone has approximately 25,000 germs per square inch compared to a toilet seat, which has approximately 1200 germs per square inch, a pet bowl with approximately 2100 germs per square inch, a doorknob with 8600 germs per square inch and a check-out screen with approximately 4500 germs per square inch.

Back in the day, when restaurants were still open for a sit-down, dining room meal, during a visit to an upscale Chicago restaurant I had the need to use the restroom. As I left the restroom, an employee, in kitchen whites, walked into the restroom with his cell phone in his hand. It hit me like a bolt of gastrointestinal pain. Even if the employee properly washed his hands, that cell phone with its 25,000 germs per square (and some new fecal material added for good measure) would soon be back in the kitchen. Today, we can add COVID-19 to the long list of potentially dangerous microbes on that cell phone, if the owner of the phone is COVID-19 positive. We also know that the virus can be transferred through the air if someone is COVID-19 positive or has come in close proximity to the surface of a cell phone. As we know, many kitchens are still operating, if only to provide carryout or delivery service. Even though we are not treating COVID-19 as a foodborne illness, great concern remains regarding the transfer of pathogens to the face of the cell phone user, whether it is the owner of the cell phone or someone else who is using it. Just as there are individuals that are asymptomatic carriers of foodborne illness (i.e., Typhoid Mary), we know that there are COVID-19 positive individuals that are either asymptomatic or presenting as a cold or mild flu. These individuals are still highly contagious and the people that may pick-up the virus from them may have a more severe response to the illness.

A recent study from the UK found that 92% of mobile phones had bacterial contamination and one in six had fecal matter. This study was conducted, of course, before the current COVID-19 pandemic. However, consider that the primary form of transfer of the COVID-19 pathogen is from sneezing or coughing. This makes the placement of the virus on the cell phone easier to accomplish than the fecal-oral route because even if the individual recently washed their hands, if they sneeze or cough on their phone, their clean hands are irrelevant.

I also know there is no widely established protocol, for the foodservice industry, food manufacturing industry, sanitizing/cleaning industry, housekeeping, etc., for cleaning and sanitizing a cell phone while on the job. For example, if you examine a dozen foodservice industry standard lists of “when you should wash your hands” you will always see included in the list, “after using the phone”. However, that is usually referring to a wall mounted or desktop land line phone. What about the mobile phone that goes into the food handler’s pocket, loaded with potentially disease-causing germs? I have certainly witnessed a food handler set a cell phone down on a counter, then carefully wash his/her hands at a hand sink, dry their hands and then pick-up their filthy cell phone and either put it in their pocket, make a call or send a text message. What applies to the “food handler” also applies to those individuals on the job cleaning and sanitizing food contact surfaces, and other surfaces that many people will come in direct contact with such as handrails, doorknobs sink handles, and so on.

How can the pathogen count for a cell phone be so high compared to other items you would assume would be loaded with germs? The high number cited for a cell phone is accumulative. How often do you clean your cell phone (or for that matter your keyboard or touch screen)? I’ll bet not very often, if ever. In addition, a frequently used cell phone remains warm and with just a small amount of food debris (even if not visible to the naked eye) creates an ideal breeding environment for bacteria. Unlike bacteria, we know that viruses do not reproduce outside of a cell. The cell phone still presents an excellent staging area for the COVID-19 virus while it waits to be transferred to someone’s face or nose.

While there have been some studies conducted on mobile phone contamination and the food industry, most of the statistics we have come from studies conducted in the healthcare industry involving healthcare workers. If anything, we would hope the hygiene practices in the healthcare environment to be better (or at least as good) as the foodservice industry. It is not a pretty picture. In reviewing various studies, I consistently saw results of the following: 100% contamination of mobile phone surfaces; 94.5% of phones demonstrated evidence of bacterial contamination with different types of bacteria; 82% and so on.

Let’s state the obvious: A mobile phone, contaminated with 1000’s of potentially disease causing germs, acts as a reservoir of pathogens available to be transferred from the surface of the phone to a food contact surface or directly to food and must be considered a viable source of foodborne illness. As we stated earlier, we are not treating COVID-19 as a foodborne illness, but we cannot ignore the role that a cell phone could play in transferring and keeping in play this dangerous pathogen.

What do we do about it? Fortunately we can look to the healthcare industry for some guidance and adapt to the foodservice industry, some of the recommendations that have come from healthcare industry studies.

Some steps would include the following:

  1. Education and training to increase awareness about the potential risks associated with mobile phones contaminated with pathogens.
  2. Establish clear protocols that specifically apply to the use of and presence of mobile phones in the foodservice operation.
  3. Establish that items, inclusive of mobile phones, that cannot be properly cleaned and sanitized should not be used or present where the contamination of food can occur or …
  4. If an item, inclusive of a mobile phone, cannot be properly cleaned and sanitized, it must be encased in a “cover” that can be cleaned and sanitized.
  5. The “user” of the mobile phone must be held accountable for the proper cleaning and sanitizing of the device (or its acceptable cover).

It’s safe to assume the mobile phone is not going to go away. We must make sure that it remains a tool to help us better manage our lives and communication, and does not become a vehicle for the transfer of foodborne illness causing pathogens or COVID-19.

Doug White, PSSI
FST Soapbox

The Real-Time Value of Technology in Food Safety

By Doug White
No Comments
Doug White, PSSI

We live in a world where information on any subject is at our fingertips and can be accessed instantly. These real-time notifications keep us up to date on whatever topics we choose. This information helps guide our daily decisions and communicate more effectively with each other.

The same is true in business. We can be more efficient and make more informed decisions based on the information we have at various points throughout our day. However, for many companies and industries, the key is figuring out what information is needed and how it can be transmitted in real-time to increase the efficiency or effectiveness of the work.

In an industry not known for being on the leading edge of new technology, it is still not uncommon to have data captured using the good old pad and pencil method. This, unfortunately, limits visibility and the timely application of that information. This is especially critical when it comes to sanitation and food safety data. It is a complex, high-risk industry with tight timelines and lots of moving parts (figuratively and literally), and various teams working together 24/7.

The 2019 Food Safety Consortium Conference & Expo features a dedicated track on Cleaning & Sanitation | Attend the event October 1–3 | Schaumburg, ILAdditionally, new rules and regulations around FSMA require processors to have more detailed documentation of a food safety plan and produce data proving adherence to that plan during plant inspections. Processors must show that best practices are being followed and address any instances where concerns may arise with immediate corrective actions, or face potential fines or temporary shutdown of production.

The bottom line is, technology is no longer a “nice to have”, it is a must have. Data is our friend and, if used appropriately, can significantly help mitigate risk and improve food safety.

Innovation in Sanitation

Specifically in the sanitization process, there is a distinct science-based, data-driven approach that can be used to document and report on the consistency and effectiveness of each cleaning process. However, without the right experience or specific microbiological training, it is hard for a processor to know what to document, how to document it and why it matters.

For instance, as part of standard operating procedures, our team always monitors and documents four key factors that can influence a successful cleaning process: Time, temperature, concentration of cleaning agents and mechanical force (i.e., water pressure). If any one variable as part of the sanitization process is off, it can impact the overall effectiveness of the cleaning.

This is the type of risk-based data that can be applied as part of FSMA reporting and compliance.

However, the real opportunity for improving food safety is about the visibility of that data and how it can be used to adjust the sanitization processes in real-time.

I was fortunate to be part of a team that developed and implemented a new real-time performance metrics platform over the last year. It is a digital system that helps sanitation teams proactively track and respond to critical data that can impact the effectiveness of the sanitation process.

Replacing the pen-and-paper method is a system in which data is logged digitally into an application on a tablet or mobile device in real-time during the sanitation process.

Site managers closely monitor data, which can be shared or accessed by other stakeholders to perform analytics and make real-time adjustments to the sanitation process. The system sends alerts and notifications regarding changes or updates that must be made as well.

From internal communications to coordination with USDA and FDA inspectors, it supports a much more seamless communication structure as well. Employees feel more confident and empowered to manage the sanitation process and partners feel armed with the right information and data to focus on managing the needs of their business.

As an industry, I believe we have a great opportunity ahead of us to continue advancing food safety. The technology and tools are there to support us. It is a matter of taking small steps to innovate and improve efficiencies in our own businesses every day that will have a drastic impact on the industry as a whole.

Emily Kaufman, Emport, Allergens
Allergen Alley

Skip Validation, You’re Asking for Problems

By Emily Kaufman
No Comments
Emily Kaufman, Emport, Allergens

Running an unvalidated program or product is like betting your life’s savings on a horse because you overheard a “surefire tip” outside the racetrack, or driving around without any mirrors.

To put it less dramatically: Skipping validation is asking for problems. But what does validation mean, how much is necessary, and what’s the best way to include it in your plans?

In order to start understanding validation, we must first break it down into two main categories: Product validation and process validation. From there, it’s important to look at whether something has been broadly validated for general use, and whether it has been narrowly validated for use in your specific situation. That last question is where people often struggle: How can we ensure this product or process is validated for use in the way that we plan to use it?

Validating an on-site allergen test kit requires a few different layers of research and testing. Taking the time to carefully design and vet a validation process may seem tedious, and it may require some additional up-front costs—but in the long run, it’s the only way to ensure you are spending your money on a test kit that works. And if you’re using an allergen test kit that doesn’t actually detect allergens in your facility—best-case scenario, you’re wasting money and time. Worst-case scenario, you’re headed straight for a recall and you won’t see it coming until your customers get sick.

If you are buying a test to determine the absence or presence of allergens in your facility (specific or general), you’ll likely ask the kit manufacturer if the test kit has been validated. This validation can come in many forms, most commonly:

  • Third party validation (eg., AOAC)
  • Internally produced validation documents or whitepapers
  • Published studies

A product with more validation (third-party certifications, studies, whitepapers) isn’t necessarily better than a product with less. It may have simply been on the market longer or be produced by a company that allocates its funding differently. However, validation documents can be very comforting when reviewing a product, as they provide a starting point for your own research. When you are reviewing validation data, ask yourself a few questions:

  • Does this data cover products like mine?
    • Are the ingredients similar (raw meat, ice cream, spices, etc.)?
    • Are the preparation processes similar (heat, fermentation, etc.)?
  • Does this data cover an environment like mine?
    • Will the tests be run the same way in my facility as in the data?
    • Is the contamination being introduced in a way and amount that feels realistic to the risk factors I know about in my facility?
  • Does the data mention any complicating factors (and do I need to care about them)?
    • Are there ingredients known to cross-react or cause false negatives?
    • Are there processes known to change the LOD or cause false negatives?
  • If I am aware of limitations with other similar test kits, are those limitations addressed in the data for this test kit as well?

To give an example, let’s imagine you make premium ice cream and are reviewing allergen test kits that look for peanuts and almonds in product, in rinsewater and on surfaces. You’ll want to ask questions like:

  • How does the kit perform in a high-fat environment?
  • Does the validation data cover product, rinsewater and surfaces?
  • Are there ingredients in our facility that are called out as cross-reactive (or otherwise troublesome)?
  • Do our ingredients get exposed to temperatures, pH levels, or other processes that impact the LOD?

You might learn, for example, that one of the matrices tested in validation was ice cream. If so: Wonderful! That’s a vote of confidence and a great starting point. Or maybe you learn that the kit in question isn’t recommended for matrices that include an ingredient in your formulation. If so: That’s equally wonderful! Now you know you need a different solution. Or maybe the instructions on your current peanut test kit indicate that heavily roasted peanuts have a higher detection limit than raw peanuts, but this new test kit only has data for raw peanuts. If so: OK! You have more research to do, and that’s fine too.

In short: Pre-existing product validation data is a helpful starting point for determining whether or not an allergen test kit MIGHT work well in your facility—but it doesn’t eliminate the need for you to run your own internal validation study.

Once you’ve identified an allergen test kit that you want to use in your facility, you’ll want to prove that it can work to identify contamination in your specific environment. This is where a more narrowly tailored validation comes into play. Your test kit provider may have resources available to help you design an internal validation. Don’t be afraid to ask for help! A reputable test kit provider should care not just about making the sale, but also about making your food safer.

Before you even order a new test kit, you should have a good idea of how your validation process is going to work. It’s important to have both the study design and study outcome on file. Here are some possible additions for your internal validation study:

Validating that an allergen test kit can reliably prove your surfaces are clean of said allergen:

  • Test the surface prior to cleaning, after the allergen in question has been run. Do you see positive results? If not, then a negative result after cleaning is essentially meaningless.
  • Test the surface after cleaning. Do you see negative results? If not, it could mean a problem with your cleaning process—or a strange interference. Both require further research.
  • If your products encounter multiple surfaces (eg., stainless steel and also ceramic), test them all with before and after testing.

Validating that an allergen test kit can reliably prove your rinsewater is free of said allergen:

  • Test water from the beginning of the cleaning cycle as well as the end. Do you see a change in results, from positive to negative?
  • If you don’t ever see the allergen present in your rinsewater, you may want to “spike” a sample by adding a small amount of the product that contains the allergen into the rinsewater you’ve collected. Could it be that something in your cleaning protocol or some aspect of your matrix is affecting the detection limit?

Validating that an allergen test kit can reliably prove your ingredients or finished products are free of said allergen:

  • Test a product that you know contains the allergen but is otherwise similar. Keep in mind that some allergen test kits can be overloaded and can show false negatives if too much allergen is present in the sample—if you aren’t sure whether the test kit you are trialing has this limitation, ask your supplier. Do you see a positive?
  • Have you encountered batches of your product with accidental cross-contamination from the allergen in question? If so, and you have some of that batch archived, run a test on it. Would this kit have identified the problem?
  • Do you have a batch or lot of product that has been analyzed by a third-party lab? If so, do your results in-house match the lab’s results?
  • Run—or ask a lab to run—a spiked recovery. This is especially important if there is no pre-existing data on how the test kit works against your specific matrices.
    • Some test kit manufacturers can provide this service for you—you would simply need to send them the product, and they can add various amounts of allergen into the product and confirm that the test kit shows positive results.
    • Some kit manufacturers or other suppliers can send you standards that have known quantities of allergen in them. You can mix these into your product and run tests, and confirm that you get positive results when expected.
    • You may want to simply do this on your own, by adding small quantities of the allergen into the sample and running tests. However, take care to be especially careful with your documentation in case questions arise down the line.
  • No matter how the spiked recovery is being run, consider these two factors:
    • Be sure you’re including what could be a realistic amount of contamination—if you’re concerned about catching 25ppm of allergen, loading up your sample with 2000ppm won’t necessarily help you prove anything.
    • The matrix of your allergen-containing foods is just as important as the matrix of your allergen-free foods. If your allergen has been fermented, roasted, pressurized, etc. —your spike needs to be processed in the same way. If you aren’t sure how to think about your matrices, this previous Allergen Alley post is a good starting place.

Once you’ve proven that the test kit in question can in fact show positive results when traces of allergen are present, you can confidently and comfortably incorporate it into your larger allergen control plan. If your matrices change, you’ll want to re-validate whatever’s new.

While it can be tempting to rely on a kit’s general validation, taking the extra step to validate your unique matrices is an essential part of a truly robust food safety plan. If you’re stumped for how to begin, contact your kit provider—after all, you share the same goals: Safe, allergen-free food for consumers who rely on you to keep themselves and their families healthy and well fed.

Sponges, environmental sampling

Mitigate the Risk: Importance of Environmental Sampling in an Environmental Monitoring Program

By Gabriela Martinez, Ph.D.
No Comments
Sponges, environmental sampling

There are several ways in which pathogens can enter a food processing facility. Once inside, pathogens are either temporary visitors that are removed using cleaning and disinfection methods, or they can persist in sites such the floor or drains and require a more intense remediation process. As food processors take on the responsibility to prevent product adulteration in facilities, setting up and maintaining an environmental monitoring program (EMP) is critical.  An effective EMP helps a company manage and potentially reduce operational, regulatory and branding reputation risks.

Establishing an EMP begins with identifying and documenting potential pathogen sources in all physical areas (including raw materials, storage and shipping areas) and cross-contamination vectors (employees, equipment, pests, etc.). These areas and vectors should be surveyed, controlled and when possible, eliminated. Implementing effective controls, including microbiological sampling of high-risk areas, should be part of the program. Sampling for pathogens or indicator microorganisms  in food contact areas during production is also important. Additionally, the EMP elevates the awareness of what is happening in the plant environment and helps companies measure the efficiency of their pathogen-prevention program—for example, it is not only critical to test for pathogens, but also for the overall effectiveness of cleaning and sanitizing procedures. Both procedures are necessary and must be properly executed to reduce microorganisms to safe levels. The goal of a cleaning process is to remove completely food and other types of soil from a surface. Since soils vary widely in composition, no single detergent is capable of removing all types. In general, acid cleaners dissolve alkaline soils (minerals) and alkaline cleaners dissolve acid soils and food wastes. It is for this reason that the employees involved must understand the nature of the soil to be removed before selecting a detergent or a cleaning regime. The cleaner must also match with the water properties and be compatible (i.e., not corrosive) with the surface characteristics on which it will be applied. However, not only the correct choice of agent is necessary for an optimal result; it should be coupled with a mechanical action, an appropriated contact time and correct operating temperature. As the combination of these parameters is characteristic to each process, it becomes essential to verify effectiveness through sampling. Finally, cleaning is closely related to sanitation, because it can’t be sanitized what hasn’t been previously cleaned.

“Not Your Grandfather’s Environmental Monitoring Program Anymore”: Learn more about this important topic at the 2016 Food Safety Consortium | EVENT WEBSITE

The Association of Official Analytical Chemists defines sanitizing for food product contact surfaces as a process that reduces the contamination level by 99.999% (5 logs). Sanitation may be achieved using either heat (thermal treatment) or chemicals. Hot water sanitizing is commonly used where immersing the contact surfaces is practical (e.g., small parts, utensils). Hot water sanitizing is effective only when appropriate temperatures can be maintained for the appropriate period of time. For example, depending on the application, sanitation may be achieved by immersing parts or utensils in water at 770 C to 850 C for 45 seconds to five minutes. The advantages of this method include easy application, availability, effective for a broad range of microorganisms, non-corrosive, and it penetrates cracks and crevices. However, the process is relatively slow, can contribute to high energy costs, may contribute to the formation of biofilms and may shorten the life of certain equipment parts (e.g., seals and gaskets). Furthermore, fungal spores can survive this treatment.

Regarding chemicals, there is no perfect chemical sanitizer. Performance depends on sanitizer concentration (too low or too high is ineffective), contact exposure time, temperature of the sanitizing solution (generally, 210 C to 380 C is considered optimal), pH of the water solution (each sanitizer has an optimal pH), water hardness, and surface cleanliness. Some chemical sanitizers, such as chlorine, react with food and soil, becoming less effective on surfaces that have not been properly cleaned.

The effectiveness of a plant’s sanitation practices must be verified to ensure that the production equipment and environment are sanitary. Operators employ several methods of verification, including physical and visual inspection, as part of ongoing environmental hygiene monitoring programs. Portable ATP bioluminescence systems are widely used to obtain immediate results about the sanitary or unsanitary condition of food plant surfaces. ATP results should be followed up with more in-depth confirmation testing, such as indirect indicator tests and pathogen-specific tests. Indirect indicator tests are based on non-pathogenic microorganisms (i.e., coliform, fecal coliforms or total counts) that may be naturally present in food or in the same environment as a pathogen. These indicator organisms are used to assess the overall sanitation or environmental condition that may indicate the presence of pathogens. The principal advantages of using indicator organisms in an EMP include:

  • Detection techniques are less expensive compared to those used for pathogens
  • Indicator microorganisms are present in high numbers and a baseline can be easily established
  • Indicator microorganisms are a valid representative of pathogens of concern since they survive under similar physical, chemical and nutrient conditions as the pathogen

However, indicator organisms are not a substitute for pathogen testing. A positive result indicates possible contamination and a risk of foodborne disease. It is recommended that samples be taken immediately before production starts, just after cleaning and sanitation have been completed when information regarding cleaning and sanitation are required. However, when sampling is conducted on surfaces previously exposed to chemical germicide treatment, appropriate neutralizers must be incorporated into the medium to preserve viability of the microbial cells.

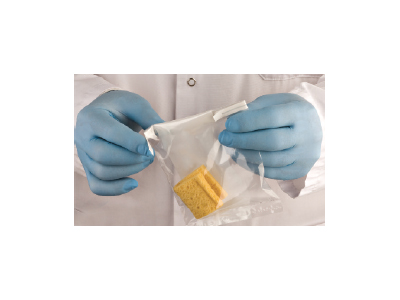
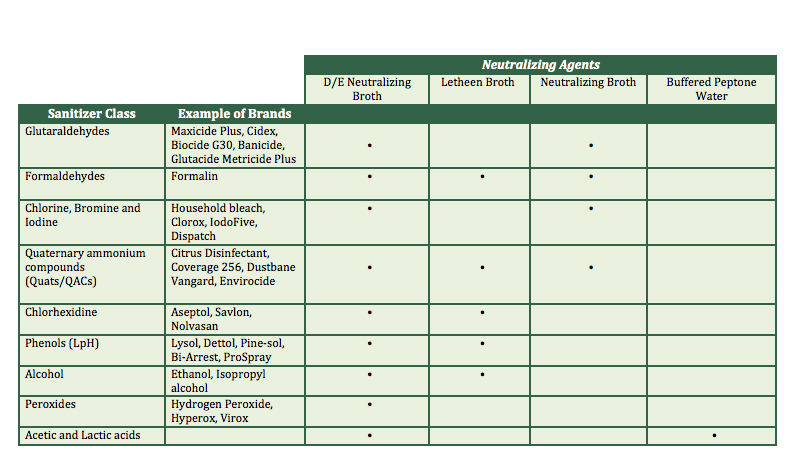
Neutralizers recommended for food plant monitoring include Dey-Engley neutralizing broth (DE), neutralizing buffer (NE), Buffered peptone water (BPW) and Letheen broth (LT) (see Table I). Most of these are incorporated into a support such as a sponge, swab or chiffon to neutralize the residues of cleaning agents and sanitizers that may be picked up during swabbing. The product should be selected based on the surface, the type of cleaning agents and the type of testing (qualitative or quantitative).

Neutralizing agents, Environmental sampling
Table I. Neutralizing agents

It is critical to verify that the chosen neutralizer has an efficient action against the used sanitizers. Table I show the most effective equivalence among the cleaning agents and the most common neutralizers.

For instance, if a quantitative method is to be used, it is very important to consider a neutralizing agent, such as the neutralizing buffer, that doesn’t support the bacterial growth.

Finally the sponge is a very popular choice due to its versatility. Sponges are used for sampling equipment surfaces, floors, walls, work benches and even carcasses. They enable the sampling of large surfaces and the detection of lower levels of contamination at a lower cost of operation.

Sani sponge
The versatility of sponges make them a popular choice for environmental sampling. Image courtesy of Labplas.

To summarize, environmental sampling is an important tool to verify sources of contamination and adequacy of sanitation process, helping to refine the frequency and intensity of cleaning and sanitation, identify hot spots, validate food safety programs, and provide an early warning of issues that may require corrective action. Over all, it provides the assurance that products being manufactured are made under sanitary conditions.

Color coding to enable allergen and potential contamination distinction

If You Aren’t Color Coding Yet, You’re Way Behind

By Bob Serfas
1 Comment
Color coding to enable allergen and potential contamination distinction

Since the introduction of FSMA, food safety has been under a much-needed magnifying glass. Standards for hygiene and accountability are increasing, and companies are implementing more measures to keep consumers safe. One of the ways in which businesses are being proactive is through implementing color-coding plans. If you have not heard of this type of plan yet, it’s time to get schooled; and if you have, this article will provide a quick refresher on why companies are expanding their spectrum on contamination prevention—by literally implementing the color spectrum in their plants and businesses. 

What Is A Color-Coded Plan?

A strategy for a plant or business that designates certain colors for a specific area or purpose designed to promote safety and cleanliness.

Example Plans. Although color-coding plans vary by the needs and demands of each plant, the following are the most popular types of color-coding plans currently being practiced in food manufacturing.

Color coding to enable allergen and potential contamination distinction
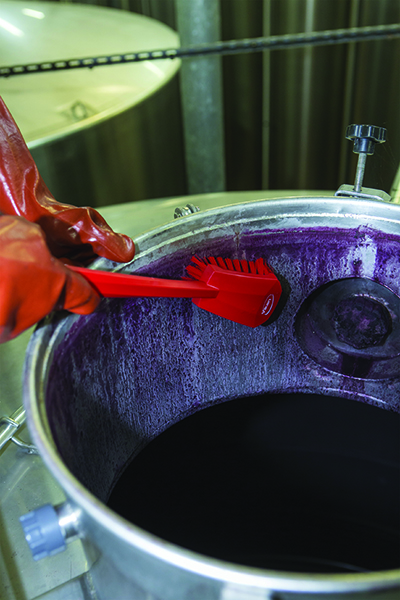
Color coding a cleaning brush can help employees make the distinction when dealing with allergens and potential contamination. All images courtesy of Remco/Vikan

Allergen/Potential Contaminant Distinction

Food Processors and manufactures usually have identified potential allergens and contaminants that pose a risk to the production process. Color distinction for equipment or instruments that come into contact with these potential contaminants is an ideal tool for food safety. Determining the amount of items that fall into this category within your facility is the first step to selecting the appropriate amount of colors to implement. The most basic color-coding plan for this purpose would be to select one color to represent tools that come into contact with a particular risk agent and one color to represent those tools that may be used elsewhere. If a plant has more than one risk agent, this plan may be expanded to include several colors. It is important to remember, however, that simplicity is key in color coding and that additional colors should be implemented strictly on an as-needed basis.

Zone Distinction

Many plants already have identified zones in place based on what is produced in each zone or simply due to operating a large plant. This presents an ideal opportunity to color code zones to keep tools in their proper place.  

Shift Distinction

Certain plants that have a large number of employees working different shift times should also consider color coding. Color coding by shift can hold each shift responsible for proper tool use and storage. This approach also allows management to see where work habits may be falling short and where the cost of tool replacement is highest. 

Assembly Process Distinction

Plants that have assembly line-like processes can implement color coding if necessary to differentiate tools that belong to each step. For example, this becomes particularly important in plants that deal with products such as meat; obviously you do not want to use the same tools with raw and processed meat. Color coding eliminates the question of whether or not a tool is meant for each step in the process.

Color coding for cleaning purpose distinction
Implement a two-color-coding plan to distinguish between tools used for cleaning versus sanitation.

Cleaning Purpose Distinction

For many food plants, cleaning and sanitizing are processes that are considered different in purpose and practice. Often, there is a specific list for cleaning and then a separate plan for sanitizing. Implementing a two color-coding plan can distinguish tools that are meant for each process.

Why You Need A Color-Coded Plan

It helps meet FSMA requirements. A major part of complying with FSMA regulations is having proper documentation to prove safety measures. Color-coding plans do exactly that, and most providers of these products can provide you with the necessary documentation.

It reduces pathogens and allergens contamination. For food producers, this is the most important reason to implement color coding. There is nothing worse for a company than experiencing product contamination or a recall; this is one step that may prevent such events from occurring. 

It is easy to understand. Color coding works so well because it is so simple. All employees, even those who may not speak the same language or are unable to read posters and manuals that dictate proper procedures, can easily comprehend it.

It creates a culture that holds employees accountable. Managers enjoy color-coding practice because it is a simple measure that really works to hold employees accountable in the proper use of tools. It becomes much more obvious when a brightly colored tool is out of place, and thus workers are more likely to follow proper procedure.

Using ATP-based Methods for Cleaning and Sanitation Verification

By Camila Gadotti, M.S., Michael Hughes
1 Comment

There are several factors that must be considered when selecting a reliable and accurate system for detecting adenosine triphosphate.

A common way to assess the effectiveness of cleaning and sanitation programs in food manufacturing facilities is through the use of methods that detect adenosine triphosphate (ATP). Methods based on ATP detection are inexpensive and rapid, and provide the ability to perform onsite in real-time. There are several manufacturers of ATP-based methods, but choosing the most reliable one can be a daunting task. This article will discuss how these methods work and which factors should be considered to make an informed purchasing decision.

ATP is the universal energy currency in all living cells. It is present in all viable microorganisms (with the exception of viruses) and in foodstuffs. High amounts of ATP can be found in some fresh foods like vegetables, while other foods, especially highly processed foods such as fats, oils or sugar, contain very low amounts of this molecule. It is also important to know that ATP can be found in the environment in its free form hours after a cell has died.1 An ATP bioluminescence assay operates on the principle that ATP in food/food residues and microorganisms, in the presence of a luciferin/luciferase complex, leads to light emission. This light can be measured quantitatively by a luminometer (light-detecting instrument), with results available in 10–40 seconds. The amount of light emitted is proportional to the amount of ATP on a surface and hence its cleanliness. The light emitted is typically measured in relative light units (RLUs), calibrated for each make of instrument and set of reagents. Therefore, the readings obtained from assessing the cleaning of food manufacturing facilities need to be compared with baseline data representing acceptable clean values.

Varying Optical Components

Luminometers have evolved over the years from very large and cumbersome in size to small handheld models that can be used anywhere within a manufacturing facility. Although several components are housed inside these instruments, the optical component is the most important part of a luminometer. Used to detect light coming from the ATP/luciferin/luciferase reaction, the optical component is the defining factor related to luminometer reliability, sensitivity and repeatability. Good luminometers use a photomultiplier tube (PMT) in the light detection system; however, as part of the drive toward cheaper and smaller instruments, some manufacturers have replaced PMTs with less-sensitive photodiode-based systems. When using photodiodes, the swab chemistry must be adapted to produce more intense light. This results in a shorter duration of light, decreasing the time window allotted to place the swab in the luminometer and obtain an accurate read. A PMT, however, multiplies the electrical current produced when light strikes it by millions of times, allowing this optical device to detect a single photon. This approach emits light over a longer period of time. Although the weight of the system is also dependent on factors such as the battery, case and the display screen, a luminometer constructed with a photodiode will generally weigh less than a luminometer constructed with a PMT, since the former is smaller than the latter.

Sensitivity Testing

When an ATP hygiene monitoring system has poor sensitivity or repeatability, there is substantial risk that the test result does not truly represent the hygienic status of the location tested. Therefore, it may provide false positives leading to unnecessary chemical and labor costs and production delays, or false negatives leading to the use of contaminated pieces of equipment. A system that is sensitive to low-level contamination of a surface by microorganisms and/or food residues allows sanitarians to more accurately understand the status of a test point. The ability of a system to repeat results gives one peace of mind that the result is reliable and the actions taken are appropriate. To test different ATP systems for sensitivity, one can run the following simple test using at least eight swabs per system:

•    Make at least four serial dilutions of a microbial culture and a food product in a sterile phosphate buffer solution.
•    Using an accurate pipette, dispense 20 μl of these dilutions carefully onto the tip of the swabs of each ATP system and read the swabs in the respective luminometer, following the manufacturer’s instructions.
•    Use caution when dispensing the inoculum onto the swab head to prevent any sample loss or spillage. In addition, it is very important the swabs are inoculated immediately prior to reading, which means that each swab should be inoculated one at a time and read in the respective luminometer. Repeat this process for all the swabs.


To test different ATP systems for sensitivity, one can run a simple test using at least eight swabs per system. Photo courtesy of 3M

The most sensitive system will be the one that results in the most “fail results” (using the manufacturers’ recommended pass/caution/fail limits).

One can also test different ATP systems for repeatability by the following test:

•    Prepare a dilution of a standard ATP positive control or a food product such as fluid milk in a sterile phosphate buffer. If using a standard ATP positive control, follow the manufacturer’s direction to prepare dilution. If using fluid milk, add 1 ml of milk into 99 ml of phosphate buffer.
•    Using an accurate pipette, dispense 20 μl of this standard onto the tip of the swabs of each ATP system and read these swabs in their respective luminometer, following the manufacturer’s instructions.
•    Prepare and read at least 10 swabs for each system you are evaluating, and capture the results on a digital spreadsheet.
•    Once all 10 swab results (for each system) are in the spreadsheet, calculate the mean (=average) and standard deviation (=stdev) for each system’s data set. Divide the standard deviation by the mean and transform the result in percentage; this value is called the coefficient of variation percentage (CV%).
The test with the lowest CV% is the most repeatable and will provide the most reliable information to help make the correct decisions for a food manufacturing facility.

Choosing the Right ATP System

There are many ATP systems available on the market to support cleaning and sanitation verification in manufacturing plants. Some systems are more reliable than others and will provide results that are meaningful, accurate and repeatable. Be sure, therefore, not to choose a system solely based on its price. Check for the quality of the instrument, ask the sales representative what kind of optical device is used in the construction of the instrument and, moreover, perform an evaluation running tests for both sensitivity and repeatability. It is also important to consider the functionality and usability of the software provided with the system to ensure that the software can be used to customize sample plans, store test results and produce reports and graphs.

Reference

  1. Jay, J. M., ‎Loessner, M. J., & Golden, D. A. (2008). Modern Food Microbiology.


About the Author:

Camila Gadotti, M.S., is a field technical service professional and Michael Hughes is a technical service professional with 3M Food Safety.

Sangita Viswanathan, Former Editor-in-Chief, FoodSafetyTech

How Effective is Your Cleaning and Sanitation Program?

By Sangita Viswanathan
No Comments
Sangita Viswanathan, Former Editor-in-Chief, FoodSafetyTech

Cleaning and sanitation programs are indispensable in a food manufacturing plant, as they assure the safety and quality of food being produced. These programs are also key in protecting the integrity of your brand. Because of these programs’ importance, 3M Food Safety sent out a survey this summer toFood Safety Tech readers to learn more about how their manufacturing plants are checked for cleaning and sanitation effectiveness.

Here is what we heard back from 155 respondents:

  • Only 5.8 percent do not perform any type of cleaning and sanitation validation program in their facilities.
  • Of the 94.2 percent that do have a cleaning and sanitation validation program in place, 92 percent use more than one method to verify cleaning and sanitation effectiveness.
  • The methods of choice in order of higher preference were: visual check (86.8 percent), microbial testing (80.5 percent), ATP swabs (70.1 percent) and protein swabs (25.7 percent).
  • The most used combination of tests was visual checks along with ATP swabs (70 percent).

Analyzing the survey results, Camila Gadotti, Professional Service Account Representative for 3M Food Safety Department was surprised there were still a proportion of respondents (though small) who didn’t have a cleaning and sanitation program in place. “This is such an important part of food safety and quality, and yet we still have some people who don’t have a program in place. Also majority of people still rely on visual check, which is not a good system for a sanitation program.”

Since respondents could check more than one choice for which method they used, a lot of people did visual check in conjunction with other microbial or ATP swab testing. Of these methods, Gadotti pointed out that microbial testing, given that it could take 24 to 48 hours to get results, would be a slow process. “In this time frame, the product could have been sold in the market. So while the test results could still be used for corrective steps to improve sanitation, it’s not the ideal choice for testing.”

Instead, ATP swabs would be a faster and more sensitive alternative, she adds. “ATP swabs work on the science that every live cell contains ATP. This is not just microbial cells, but also product residue, which will generate light based on the chemistry of the product. And results are back in 10 seconds. So you can walk around, collect swabs, put them in the illuminator, and you will very quickly get a number, which is the Relative Light Unit. If the RLU level is considered safe, the facility is clean.” With new and stricter regulations on the food industry horizon, companies are increasingly moving to adopt ATP swab for their sanitation programs, says Gadotti.

Besides which method to choose, another important step in creating a cleaning and sanitation validation plan is the number of sampling sites to be tested. Readers were asked how many locations they test for and there was a wide spread of answers:

  • 65.3 percent test between 5 to 20 different locations in their plants for cleaning and sanitation effectiveness;
  • 14.6 percent of the respondents test between 20 to 30 locations;
  • 6.2 percent of the respondents test between 30 to 40 locations;
  • 3.5 percent of the respondents test between 40 to 50 locations; and
  • 10.4 percent of the respondents test more than 50 locations.

The respondents of this survey work in facilities that range from fresh cut fruits and vegetables to dairy, confectionery, meat and poultry plants. Each of these facilities chose validation methods that were deemed appropriate to support their cleaning and sanitation plans in their manufacturing plants. Although some methods are more common than others, choosing the right method for each processing plant will depend on factors like the type of food being produced, turn-around time, product label claims and, of course, cost.

Another observation from the survey was that people still see verification of sanitation program as an expense. Instead companies need to view this as an investment for the company and its food safety program, Gadotti says.

“Verifying the effectiveness of your cleaning and sanitation program does not need to be a lengthy and troublesome task. Adopting a couple different methods of verification, such as visual checks, microbial testing and/or ATP swabs, tested for in a couple dozen strategic locations throughout your plant should suffice to verify that your plant has been properly cleaned and sanitized. Remember, verifying cleaning and sanitation may help you prevent many issues like reduced shelf-life in your products and unnecessary product recalls,” she sums up.