Most recently we have seen an increase in foodborne illness outbreaks from Listeria to Salmonella to Norovirus to E.coli, many of which are a result of post-lethal contamination of processed foods. This is often a direct result of a gap in the sanitation programs that were in place at the processing facilities. Every facility should conduct a sanitation gap analysis on an annual basis. In order to receive unbiased feedback, this activity is best performed by a third party that is not a chemical provider.
Join Gina Kramer at the Listeria Detection & Control Workshop, May 31–June 1 in St. Paul, MN | LEARN MOREDeveloping and implementing a sound environmental hygiene program at a food processing facility is essential to its success in producing safe food for consumer consumption. There are fundamental basics of sanitation that every plant must follow in developing a strong program. The fundamental basics include: Developing sanitation standard operating procedures (SSOPs) for; Floors and drains, walls, ceilings, equipment and utensils, and employees. SSOPs must also contain perimeter control, foot traffic control into food preparation areas, zoning, and environmental sampling procedures.

When developing SSOPs, using the proper risk reduction formula will lead to sanitation success. To determine the best risk reduction formula, I sought the advice of sanitation expert, Jeff Mitchell, vice president of food safety at Chemstar. Before working for Chemstar, Mitchell was the Command Food Safety Officer for the United States Department of Defense (DOD). Serving more than 20 years for the DOD has given him the opportunity to visit thousands of processing facilities all over the world, seeing the best and the worst, and assisting in finding the root cause of contamination issues and negative environmental sampling results. In this article, I share Mitchell’s risk reduction formula for sanitation success and how to use the formula to build a solid and successful sanitation program.
Foundational Science
“An understanding of the difference between transient and persistent (or resident) pathogens is a key part in the foundational science of sanitation solutions,” explained Mitchell as we discussed the details of the risk reduction formula. Transient pathogens are those that are introduced to the processing facility from the external environment. Entrance occurs from deliveries on transportation vehicles and pallets, food, and non-food products and its packaging, employees and visitors, pests and rodents, along with leaks in the roof or improper cleaning of drains, which are known reservoirs.
 “Persistent pathogens are those pathogens that establish residency within the processing facility. Most bacteria will aggregate within a biofilm, allowing them to live in communities. A biofilm is a survival mode for the bacteria; it protects it from sanitizer penetration. The biofilm layers actually masks it from sampling detection. You could swab a surface or an area and not get a positive pathogen test result, because the biofilm is masking it,” Mitchell stated. He continued to explain that most contamination risks are likely from established populations. Four things need to exist for resident populations to form: Pathogen introduction, water, trace organics and niche area for attachment and growth. Food processing facilities should be most concerned about these populations, as they’re being traced to many recent outbreaks and recalls.
In his experience, Mitchell shared that sanitation efforts should focus on areas within the processing facility where moisture and nutrients are collected; both are needed for biofilm formation. Disruption of these niche areas containing biofilm can result in direct (food contact) and indirect (non-food contact) contamination if the biofilm is not completely penetrated or removed. This can occur through active and passive dispersal of pathogens. Active dispersal refers to mechanisms that are initiated by the bacteria themselves where they naturally eject from the biofilm and land on other surfaces. Passive dispersal refers to biofilm cell detachment that is mediated by external forces that shear the biofilm, causing it to move and further spread. This can be caused through fluid shear, abrasion and/or vibration due to power washing, equipment vibration, or deep cleaning/scrubbing that does not penetrate and remove all the aggregate layers of biofilm. In other words, the biofilm and pathogens are just smeared around the facility like cleaning a mirror with a greasy wiping cloth.
Chemistry and Application
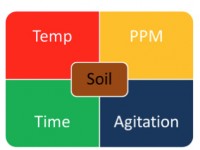
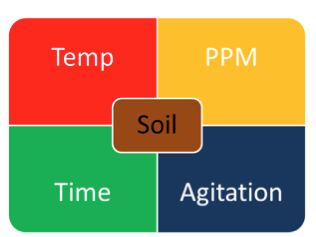
 The cleaning matrix must be considered to properly remove soils that house both transient and persistent pathogens. This is done by combining proper cleaning and sanitizing agent concentration (PPM), adequate exposure time, proper temperature and mechanical action (agitation) or good old elbow grease. If there is a decrease in one area of the matrix, then an increase in the other areas needs to be made as an accommodation to the cleaning process. My years working in industry have taught me that the most expensive quadrant of the cleaning matrix is agitation, because it requires manual labor. Reduction of labor is one of the first ways companies build in efficiencies to increase profit margins. That means a solution must be built that focuses on temperature, concentration and proper contact time to produce the sanitation results necessary to prevent persistent pathogens from establishing residency within processing facilities.
Temperature should be regulated by the type of soils that need to be removed. High fat soils need a higher temperature of about 140⁰ F. However, when removing high protein soils, the temperature needs to be reduced so that the protein is not baked onto the surface. Baked proteins that are not removed become nutrients for bacteria to aggregate and reside. High temperature is does not work in every food processing plant, Jeff explained.
Proper balance of detergent and sanitizer is necessary to remove and destroy both transient and persistent pathogens. The detergent needs to be the right formulation and contact time to break down soils and biofilms with application of the right concentration and contact time of sanitizer to kill the exposed pathogens. Without the right balance in place it can create the perfect storm for spread and contamination within the processing facility.
Validation
Do your homework. Research is the most valuable tool when validating the effectiveness of a cleaning process. Private research is good but not the only form of validation on which to base a business decision. I have found that peer reviewed published research is best to use in validating all quadrants of the cleaning matrix. Academic research based on sound science that has practical application results is worth the investment to make sound business decisions.
Many products have been developed to penetrate and destroy the biofilm layers that bacteria aggregate. Again, do your homework. Choose a product that also provides a pathogen kill once the biofilm has been penetrated. I cannot stress enough to make sure that the SSOPs follow the manufacturer’s validated processes and the sanitation team follows the SSOPs’ directions.
Solution
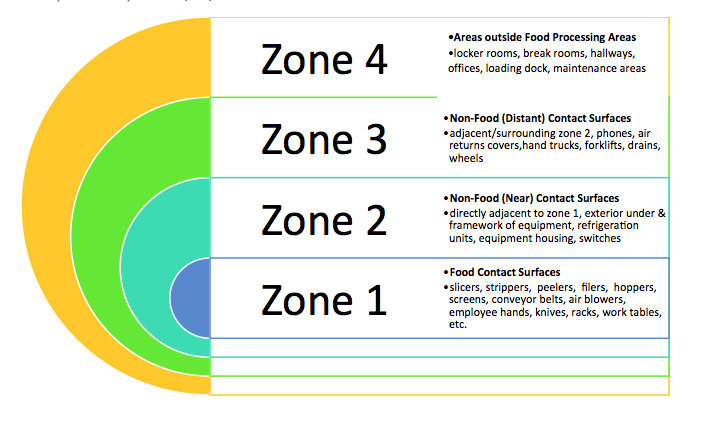
Applying the desired solution requires dividing the processing facility into zones to designate specific sanitation requirements. This will assist in the development of specific SSOPs that apply the right solution in the right zone throughout the site.
 Mitchell also gave great advice about cleaning tools and cleaning chemical basics. He explained that a facility should color code the cleaning tools according to zone and only use them in the designated zone area. This prevents cross contamination from occurring, because cleaning tools can be vehicles of contamination transfer. Utilize foam detergents and foam sanitizers as they are more forgiving and increase contact time, and sanitation crew can see where they have applied the chemicals. Use the Ross-Miles foam test for stability: Foam should last more than three minutes before breaking and turning into a liquid solution that runs down the drain, costing a site money and opening up the potential for introducing pathogens into production rooms.
Mitchell advised the development of sanitation procedures that focus on daily thorough cleaning of everything from the knees down in Zones 1-3. “You want to knock everything down and keep it down. The objective is to keep bacterial creep from occurring,” he said. “Creep is where bacteria are moved by processes like water spray, splash and aerosolization, causing the bacteria to move from one area (it usually develops on the floor) to then move up walls and the legs of equipment, etc.— eventually causing contamination of food during food production and packaging.” Obviously, all food contact surfaces in Zone 1 need to have specialized SSOPs according to the equipment, food processing shifts per day, and type of foods that are being processed.
Mitchell stressed that perimeter and foot traffic control entry programs should incorporate a good foam sanitizer that stands up to the Ross-Miles test with optimal duration of five minutes. The distribution of the foam should cover a large enough area that the employees’ foot path and equipment must travel through the foam to achieve contact to control transient pathogen entrance into Zones 1–3. Concentration levels of these areas should be at least double what the food contact area strength is for effectiveness of log kill needed for control.
Environmental monitoring procedures should follow the zoning process set up for sanitation. “Swabbing for Adenosine Triphosphate (ATP) and/or Aerobic plate count (APC) are tools that can be used to help identify biofilm locations. One thing to note is that the bacteria located under the biofilm are in a modified dormant state requiring less energy and making less ATP available for detection. With that said, ATP and APC swabbing are still both viable tools to use in sanitation verification,” said Mitchell. If you only test for general risk pathogens in your facility you may receive false negatives due to biofilm masking the pathogen from showing up as a positive in environmental testing. Utilizing both general pathogen, ATP and APC in concert, is the best combination in a facility’s environmental monitoring program. The goal is to seek and find then destroy and verify.
I recently discovered a great biofilm visual detection test from Realzyme that is wonderful to use to verify whether the sanitation system in place is working. It can also differentiate between protein build-up and biofilm formation. In my professional opinion, this visual detection test is essential to incorporate in a robust environmental testing system.
Safe Food: The End Product
Our responsibility as food safety/quality professionals is to provide the safest, most delicious food for our customers to enjoy. To ensure safe food in our end product, we need to develop a robust sanitation and environmental testing program that follows the risk reduction formula (Foundational Science + Chemistry & Application + Validation = Solution) and conduct an annual sanitation gap analysis by a third-party expert for continuous improvements.
Apply these steps to protect your food, protect your brand and protect your customers so that they Savor Safe Food in every bite!


