Millions of aluminum and tin-plated steel cans enter the marketplace every day, yet despite the extensive efforts of manufacturing plant quality control systems, a small percentage of the cans may have defects that can result in loss of the can integrity and subsequent contamination of the food products. Quality control operations within manufacturing plants typically have limited analytical chemistry capabilities and must rely on the manufacturer’s laboratory or independent laboratories to help identify and characterize the defects and troubleshoot the operations to eliminate the root cause of the defects. This article will present some of the current technology utilized for evaluating metal can defects.
Metal cans made from aluminum for beer and beverage products have been in use for about 50 years, whereas tin-plated steel cans for food products, have been in use for more than 100 years. Throughout that time, many improvements have been made to the design of the cans, the materials used for the cans (metal and internal/external protective organic coatings), the manufacturing equipment, chemical process monitoring, and quality control methods/instrumentation. The can manufacturing plants and their material suppliers are responsible for product integrity prior to distribution of the cans to food and beverage manufacturing operations throughout the world. Incoming quality control and internal quality control are also quite extensive at those manufacturing locations. Many of the can defects that would result in potential consumer issues are quickly eliminated from the consumer pipeline as a result of the rigorous quality control procedures. Occasionally, defective cans find their way into the marketplace, resulting in consumer complaints that must be addressed by the manufacturers.
The cause of the defects must be determined quickly, even if it means shutting down production lines while waiting for answers and corrective actions. Anything that results in a major product recall will have a high priority for the manufacturers to determine the root cause and take corrective actions. Major manufacturers have extensive analytical laboratories with a vast array of instrumentation and technical expertise for troubleshooting the defects. Smaller manufacturers usually have to rely on a network of independent laboratories to assist with their troubleshooting analyses.
Instrumentation and Methodology
Most major can manufacturing plants produce several hundred thousand to several million cans per day, and any can defects detected during quality control inspections will obviously have major implications. Most aluminum and tin-plated steel cans have an organic protective coating applied on the interior surface. One of the major quality control tests is to determine the amount of metal exposure inside the cans. This is done through the use of Enamel Rater instrumentation in which a sampling of cans are filled with an electrolyte. An electrode is immersed into the liquid and external contact is made with the can’s bottom or side wall. When a voltage is applied to the system, the current generated is directly proportional to the amount of exposed metal; a very small amount of exposed metal is acceptable. By reversing the polarity of the system, exposed metal regions produce gas bubbles as a result of the electrochemical reactions. This allows the inspector to identify the location of the exposed metal. When too much metal exposure is encountered, the troubleshooting process begins immediately.

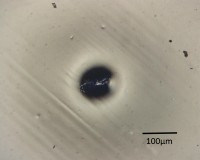
Visual examination of additional cans from the production line is done, followed by examination with a low-power microscope, typically a stereo microscope, in order to characterize metal exposure defects. Typical defects are craters and/or fisheyes, which are seen as circular dewetting (also known as pullback) of the coating from a solid contaminant on the metal (see Figure 1) or an incompatible liquid, such as machine oil mist (fisheye). Additionally, broken blisters in the coating, known as solvent pops, can occur in the curing oven for the coating, resulting in exposed metal. The metal exposure produces two main problems for the filled food product: Metal migration into the product and corrosion of the metal, which eventually results in perforation and product leakage. Manufacturing plants typically do not have the necessary analytical instrumentation available to identify the contaminants and must send selected samples to the laboratory for the analysis.
Another critical test that is conducted in the can manufacturing plants looks for adhesion characteristics of the internal coatings and external coatings (inks and over varnish). A typical adhesion test involves cutting open the sidewalls and immersing the cans into hot water for a period of time. Upon removal from the water, the cans are dried and a tool is used to scribe the coatings. A tape is applied over the scribe marks and rapidly pulled off. If any coating comes up with the tape, the troubleshooting process must begin. Often, over-cure and under-cure conditions can result in coating adhesion failure. The failure can also be caused by a contaminant on the surface of the metal. Loss of internal coating adhesion can result in flakes of the coating contaminating the product and also metal exposure issues. Adhesion failure analysis is typically conducted in the analytical laboratories.
Analytical laboratories are well equipped with a vast array of instrumentation used to identify and characterize various can defects, including:
- Optical microscopes, both stereomicroscopes and compound microscopes, are used with a variety of lighting conditions and filters to observe/photograph the defects and in some cases perform microchemical tests to help characterize contaminants. They are also used to examine metal fractures and polished cross sections of metals looking for defects in the metal that may have caused the fractures.
- Scanning electron microscope (SEM) equipped with the accessory for energy dispersive X-ray spectrometry (EDS) are used, in conjunction with the optical microscopes, to observe/photograph the defects in the SEM and then obtain the elemental composition of the defect material with the EDS system. This method is typically used for characterizing inorganic materials. Imaging can be done at much higher magnifications compared to the optical microscopes, which is particularly useful for analysis of fractures.
- Infrared spectroscopy, commonly referred to as Fourier Transform Infrared (FTIR) spectroscopy, is used mainly to identify organic materials, such as, oils, inks, varnishes, cleaning chemical surfactants that are commonly found in the can manufacturing operations. Solvent extractions from adhesion failure metal surfaces and the mating back side of the coating are often done to look for very thin films of organic contamination.
- Differential scanning calorimetry (DSC) instrumentation is often used to determine the degree of cure for protective coatings on cans exhibiting adhesion failure issues.
Other more specialized instrumentation that is more likely available in independent analytical laboratories includes:
- X-ray photoelectron spectroscopy (XPS), also known as electron spectroscopy for chemical analysis (ESCA), is used to analyze the outermost molecular layers of materials. The technique is particularly useful for detecting minute quantities of contaminants, typically thin films involved in adhesion failures. Depth profiles can also be done on the metal to determine thickness of oxidation or the presence/absence of surface enhancement chemical treatments. High-resolution binding energy measurements on various elements can provide some chemical compound information as part of the characterization.
- Secondary ion mass spectrometry (SIMS) is also an outer molecular layer type of analysis method. Depth profiling also be accomplished with this instrumentation, but one of the major advantages is the ability to detect boron and lithium which are found in some greases and other materials in the manufacturing facility. To help identify organic films that may have resulted in the adhesion failures, it is often crucial to know if boron or lithium is present, which helps identify a potential source.
- X-ray diffraction (XRD) instrumentation is used to identify crystalline compounds, mainly inorganic materials but can also be used for certain organic materials. Inorganic materials, isolated from coating craters, are often identified with a combination of SEM/EDS and XRD analyses.
Three case studies are presented to show how analytical lab instruments can be used to identify and characterize metal can defects.Metal can defects can take on numerous forms, some of which have been discussed in this article. Extensive quality control activities in can manufacturing plants often prevent defective cans from entering the marketplace. Characterizing the cause of the defects often requires major troubleshooting activities within the production plants, supplemented by the analytical laboratories with a vast array of instrumentation and personnel expertise. Due to the huge quantities of metal cans produced each day, it is inevitable that some defective cans will make it to the marketplace, resulting in consumer complaints. High priorities must be assigned to consumer complaints to not only identify and characterize the defects, but also to determine how widespread the defective cans are within the marketplace. In this way, decisions can be made regarding product recalls.


Good article, Wayne. I worked in the Coors can plant QA/QC/R&D labs in the 1980s & 90s, where we used many of the tools you mentioned. Two of the more common failure causes in cans were (a.) rolled-in debris particles and (b.) inclusion particles in the sheet aluminum. We found these with the help of a not-overly-sophisticated stereo microscope. Aluminum cleanliness and homogeneity are critical to cans. A low-power microscope is still the can/end/tab manufacturing engineer’s best friend.